The techniques explained below make Fusion more efficient to use, especially for data entry. For the most part, these techniques are the same that are used in most other Macintosh and Windows applications. Taking the time to learn them now will save you time later in Fusion and other applications you use.
When you are entering data in a window, use the Tab key to move the cursor to the next field. This is faster than lifting your hand from the keyboard in order to use mouse to click in the next field. Tab moves the cursor to the next field while Shift-Tab moves the cursor back to the previous field.
| Fusion evaluates many fields after you have tabbed out of them in order to make sure incorrect data has not been entered. If perform an action or close a window before tabbing out of a field which you have just entered information in, Fusion may use previous (often blank) value for that field. Make sure you are in the habit of tabbing out of fields before assuming the information is accepted. |
It is easy to enter dates in Fusion when you know the following shortcuts. These work when the cursor is in a date field.
Type the P key ("P" for "Popup" or "Picker") to open the Date Picker window which lets you visually choose a date with the mouse.
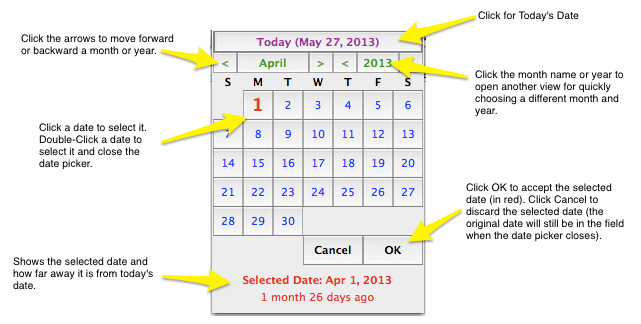
Fusion also makes it easy to enter dates directly. Although dates are usually displayed with forward slashes separating the month, day, and year (ex. 12/25/2014), you can actually use pretty much any character other than a number as a separator when typing a date. For example, some people find it easier to use the Space Bar or Period key (especially when using a keypad). As an example, if you entered 12.25.2014 Fusion would interpret that as 12/25/2014.
Often when you enter dates, you are doing so for dates close to the current date. Fusion takes advantage of this to allow you to enter less of the date. For example, if you only enter a day (ex. 25) Fusion will assume the current month and year. If, in the example, it was December 2014, Fusion would change the typed in 25 to 12/25/2014. Similarly, if you enter the month and day, Fusion will assume the current year.
If you do enter all three parts of the date, you usually only need to enter two digits for the year.
Fusion expects you to enter the date in the same order as you have set up in the operating system preferences. If you are using Windows, make sure that both the long and short system dates have each date part in the same order. If this is not the case, Fusion will misinterpret the dates you enter. Fusion stores dates in a special format internally, so it is possible to have different computers on the same network that display the dates differently.
Fusion sometimes uses a popup field (also called a drop-down field) for you to choose an option. Popups look similar to this:

They work by simply Clicking them with the mouse and then choosing an item
Bound Text Fields are a more powerful variant of this field type that Fusion uses where you are entering data. The main advantage of a bound text field over a popup field is that you can manipulate it completely from the keyboard. Bound text fields look similar to this:

If you know what you want to enter in this field, just start typing. Fusion will use clairvoyance (also called type-ahead) to guess what you are typing from a possible list of values. As soon as the correct entry is shown, hit the Tab key to accept the entry. In most cases you only need to type two or three letters before moving to the next field.
You can also hit the Up-Arrow or Down-Arrow keys to see a list of possible entries. With the list open you can continue to type using clairvoyance or use the arrow keys to select the desired value. Once selected, hit Tab or Enter to choose the value.
You can also use the mouse with bound text fields. Click the button to the right of then entry area to show the list. Double-Click to select a value.
Contact fields are where you enter the name of a contact based on your contact list. Contact fields look like normal fields until the cursor enters the field. Then they look similar to this:

If you know the name of a contact, just start typing it in the field. Fusion uses clairvoyance so you usually only need to type the first two or three letters. Once the contact name is showing, hit Tab to accept it and move to the next field. You can also click the magnifying glass button on the right for more options. Depending on the situation there may be options to search for a contact or create a new company or person contact. If you choose to search a small window will open where you can type a few letters to look up the contact. This can be from the contact name or other information such as a phone number or address. Once you find the contact, Double-Click it to choose it. If you create a new contact, save the new contact and then start typing it in the contact field. This makes it easy to enter contacts on the fly, especially when first starting to use Fusion.
There are two kinds of lists in Fusion. Some aspects of them work the same, but there are many differences. For the type of list found in list type windows (ex. Pen List window or Animal List window) please see the help topic titled List Windows. For the other type of list, keep reading.
When you want to work with a row, you need to select it (some people call this highlighting) to create a selection. To select a row, click on it. When you click on another row, it will be selected and the previously selected row loses its selection. To select multiple rows (when allowed), click the first one to select it and then shift-click the last one. All rows between the two will also be selected. This is called a contiguous selection. A non-contiguous selection is one where multiple rows are selected, but they are not necessarily next to each other. To do this, Control-Click (Command-click on Mac) rows and each will become part of the selection. If you Control-Click a row that is already selected, it will lose its selection. To select all the rows displayed in the list, make sure the list has the focus and type Control-A (Command-A on Mac). Using combinations of the above rules makes it easy to create any kind of selection you want.
Where allowed, you can click on a column header in a list to sort the list by that column. Clicking it again will cause Fusion to sort the other direction.
You can click and drag the space between two columns to resize them (where allowed).
If you Right-Click anywhere in a list header area, you will be given the option to print the list as is. You can also copy it to the clipboard or save it to a file. This is often a good way to get a quick copy of the list without setting up a report. Fusion will print the list in the order it is currently shown and with the columns the same size as they are on screen.
In order to work better on touch screens at chuteside and in the truck, Fusion has several types of custom fields that open a window suitable for touch screen entry. These fields are larger so they are easier to touch with your finger and they have a blue background as in this example:

When such a field is tapped, one of the following windows will open. Which one opens depends on what type of information you are expected to enter.
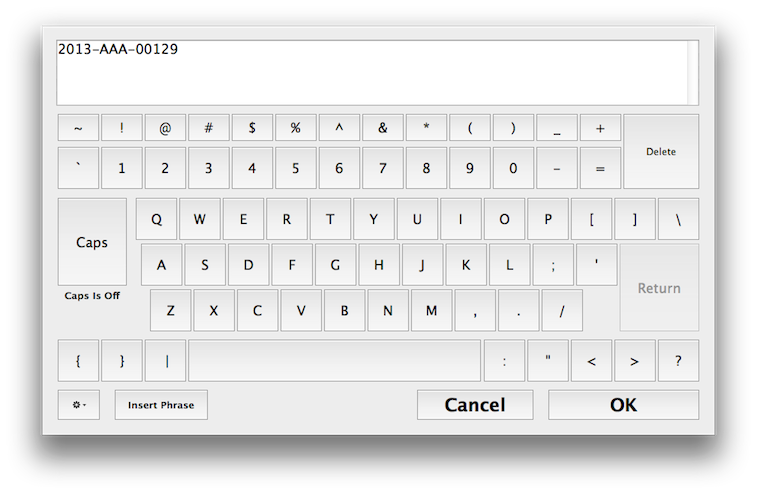
For regular text entry, this window will appear. Tap a letter to enter it into the text field at the top. You can tap inside the text field to change the location of the cursor. Tap the Caps button to change the keyboard to uppercase letters. Tap it again to go back to lowercase.
If you find yourself typing in the same thing many times, you can add a phrase to the remembered phrases list. To do this, enter the phrase into the text field and select it. Then click the  button and choose Remember Selected Text. The phrase will be added to the list. In the future, click the Insert Phrase button and then choose the phrase from the list to insert it in the text field.
You can also use the  button to manage the remembered phrases by deleting ones you no longer want. Remembered phrases are available to all computers on the network.
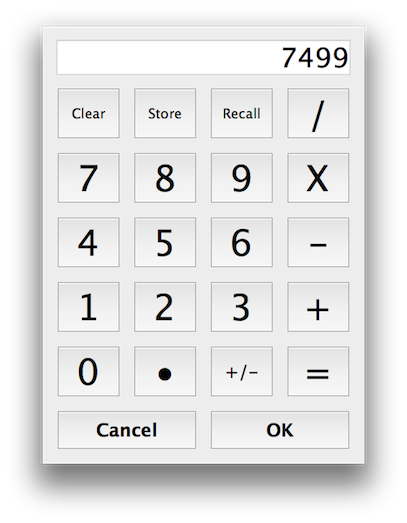
The keypad is used to enter numbers such as weights. In normal usage, a number is entered directly and then you will tap OK to accept the number. However, the keypad can also work as a calculator with the normal basic calculator functions including a memory key. This can be useful if you need to figure out a value before entering it.
Tap the Store button to store the currently displayed number in the calculator memory. The number will stay in the calculator memory until Fusion is quit or until it is replaced by another number. Or tap the Clear button to clear the memory directly. To use the number in memory, tap the Recall button.
At any time you can click the OK button and the number currently displayed will be placed in the field you originally tapped.
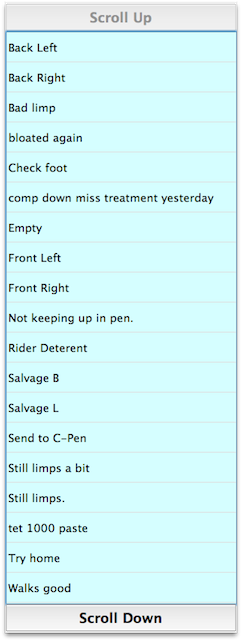
When you need to choose from a list, this window will appear. Just tap an item to select it. If there are more items than will fit on the screen, tap the Scroll Up and Scroll Down buttons to scroll the list. If you tap somewhere off the list, the field will be left as it originally was.
Sometimes Fusion will use the touch screen list picker to replace menus on touch screens. If the menu would have had submenus in a normal system, Fusion will display the main list first. Once you choose an item, if it has a submenu, the submenu list will be displayed.
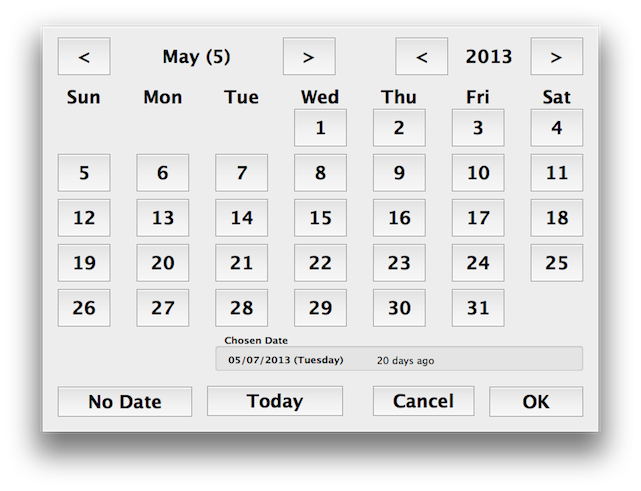
This window is used to select a date. Tap a date to select it. You can tap the arrow keys to change the month and year. If allowed, you can use the No Date button to choose a blank date. Tap the Today button to change the date to today's date. When a date is selected it will also be displayed in the Chosen Date area along with information showing how far away the date is from today's date.
When the correct date is selected, tap the OK button to accept it.
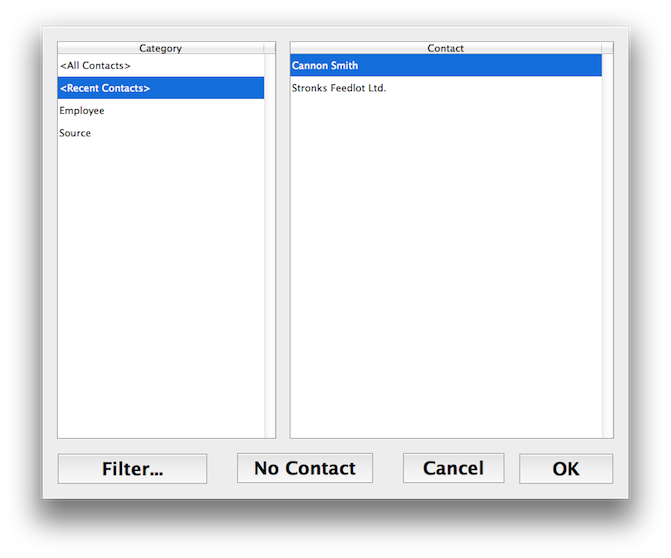
This window is used to choose a contact on a touch screen. By default it just lists all your contacts from which you can select one. However, it has several features that make it easier to use once set up correctly.
On the left hand side there is a Category list. When you create a contact, you can assign it one or more categories of your choosing. For example, you might assign certain contacts the category of "Buyer". This part of the window will list all such categories and if you tap a category only the contacts from that category will be shown to choose from. There are also two special categories called All Contacts and Recent Contacts. All Contacts simply shows all contacts, but the Recent Contacts category shows a list of contacts you have selected with the window since you last launched Fusion. Each time the window opens, Fusion remembers which category was last selected and starts with that category selected.
When you are first building the recent list or looking for a contact you don't normally use, tap the Filter… button to get a list of letters. If you choose a letter, the list will only show contacts that start with that letter.
When you have selected the correct contact, tap the OK button to accept it. You can also tap the No Contact button to enter a blank contact in the field.
Please see the Entity Chooser topic for more information about working with entities and linking animals.
Most windows can be closed by clicking the close button. The keyboard shortcut for this is Control-W (Command-W on Mac). For data entry windows closing a window will save the information before closing it. If you don't want it saved, make sure you click the Cancel button. The Esc button is usually associated with the Cancel button.
As with other applications, Fusion takes advantage of the system clipboard. The clipboard is an area of memory that the operating system uses to store information that can be transferred between applications. For example, if you select some text in Microsoft Word and choose Edit → Copy, the operating system will remember the text you have selected in its clipboard. You can then switch to another application (or stay in Microsoft Word) and choose Edit → Paste. The text in the clipboard will then be inserted into the document where the cursor is.
During normal text entry, Fusion works the same as other applications. Fusion can also place things in the clipboard at other times. For example, you can send an advanced print report to the clipboard instead of the printer. When you do this, Fusion simply outputs the text of the report into the system clipboard. You could then switch to Microsoft Excel, for example, and choose Edit → Paste to paste the report contents into a spreadsheet. This is a quick way of getting data from Fusion into other applications for further analysis or reporting.
For normal text entry, Fusion supports the standard keyboard shortcuts: Control-C (Command-C on Mac) to copy, Control-V (Command-V on Mac) to paste, and Control-X (Command-X on Mac) to cut. If you choose Edit → Show Clipboard, a window will open that shows the current clipboard contents (if they are textual in nature—it won't show pictures or other types of data that can be in clipboards).